this tutorial, I thought to myself - not
any similarity to other tutorials is purely coincidental and is not intended
My Tuts neither own Ausgegebn be
My Tuts neither own Ausgegebn be
still other pages are new chair.
may also without my permission, not translated, or used for
Workschops / schools and craft groups.
may also without my permission, not translated, or used for
Workschops / schools and craft groups.
© by Supersuzi

written using GIMP 2.6 at 06 February 2011

first
you looking for a photo, what you want to gild a part
for example to create a map - if you should take mine,
please write to my © Photo © Supersuzi
please write to my © Photo © Supersuzi

second
it trimming
3rd
hereby relieve the part that you want to gild,
which method you're using is up to you leave
(Lasso, foreground selection, path, & double layer mask) 4
double the level with the Indemnified part
fifth
save the image as a barrier for the first time from xcf
sixth
in the middle and upper level of the alpha
7th
the middle level filling with a golden color gradient or a Texture
put them on and add, or hue
- since you mußft see what better fits

eighth place on the top level overlay
and Opacity put on 50 - 70%
9th
if you still have a little more contrast
want to go to the top level and open the curves dialog and set in
" value "a slight S-curve, a
repeat this step if necessary

10th
now you have possibly the opacity again correct
11th
save again
case may be, even in jpg
if you later another want to make drum Ranbd
Now we want to make a nice small frame drum
12th
go with right click in the Layers dialog "Merge Image"
13th
mark the part vergoldetetn
14th
Copy and Paste as new image
16th 15th
open your palette dialog

right click in this dialog and select "Import Palette"
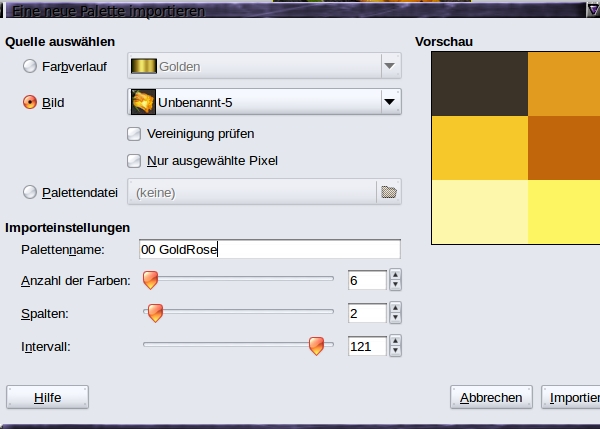
interval in the control slide slowly so far,
until you have 6 beautiful colors -
a beautifully light and a beautiful dark should be the
then click on "Import"
and open the pallet, so that we have reached broad the colors close
17th
the little picture now and go to your general picture,
where we want to make the frame drum
18 .
choice - nothing
20th
Click> in your small color palette, a nice bright color -
it is now your foreground color
changing of VG and HG Color:

and dark as the foreground color can click
21st
Filters -> Decor -> Add borders 1-1-VG-25
when you right-click in the "Border Color" button, you can search
VG - HG - Black and White
select when you click with your left you have the normal color range

22nd
again the same filter 2-2-HG-25
23rd
again the filter with 1-1-VG-25
24th
merge image
25th
again the filter with 15-15-HG-25
26th
barrier at this level, the alpha male and
wild with all your new color palette rum on it

27th
double this level and on the top of the
Filter -> Distort -> Mosaic
matches (because the settings as you like it)
28th
merge image
and then steps 21-24 again
29th
repeat is a picture -> Scale (long Page 600 px)
30th
Filter -> Enhance -> sharpen with 10 px 31st
& text watermark on it and, if the credits
32nd
save as jpg and you're ready
I hope
you had pleasure in handiwork
0 comments:
Post a Comment