this tutorial, I thought to myself -
any similarity to allowed other tutorials is purely coincidental and is not intended
My Tuts neither own Ausgegebn will
My Tuts neither own Ausgegebn will
new chair or on other pages.
may also not be translated without my permission or
be used for Workschops / schools and craft groups.
may also not be translated without my permission or
be used for Workschops / schools and craft groups.
© by Supersuzi


we need this mask:

I've created (so it is © by Supersuzi)
you save it with right click from
first
now open a new screen with 600x450px
second
ask the foreground color to bright blue (I'll take the 7fc1ff #)
and the BG color to a dark blue (I've since # 0f00a0)

third
fill your background with a gradient "FG to BG (RGB)"
and then the Filter-> Artistic-> canvas to taste
and then the Filter-> Artistic-> canvas to taste
fourth
create a new layer and fill it with the same gradient
but other direction and other odd
fifth
get the mask in your picture

6th
now add the top level of a layer mask to
by you with the right mouse button in the Layers dialog to the top level and click
Layer Mask Add ... "

now you have your layers in the Layers dialog behind preview
still a black box, this is the layer mask
7th
click in the Layers dialog > Invert and then
- - on the layer mask then
-> Colors> Edit -> Copy
8th
now click on the layer mask in the top level
and then -> Edit ->

Here insert you see now that the Top Level the mask in the Layers dialog and
adopted something of a "floating selection" is
9th
this selection anchor us now by clicking on the anchor:

10th
click with the right to the top level (the one with the layer mask) and select apply layer mask
11th
is now a shadow on this layer with
3-3-5-no change in size
you save it as *. xcf from
12th
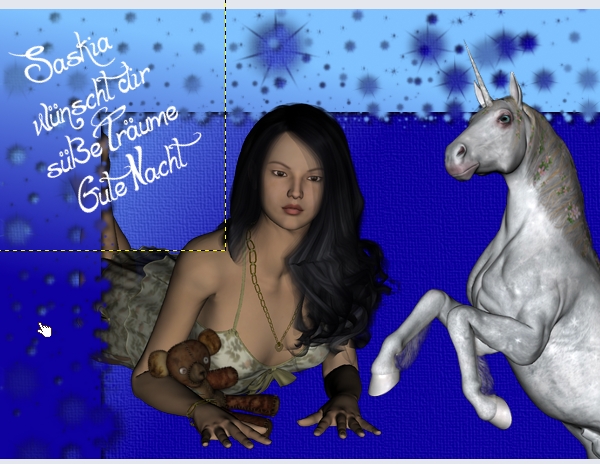
now you are looking for (or more) beautiful Tube (s) assigned
and according to your taste
my tubes are of Shania THANK Shania
your the tubes hönnt under the mask layer slide, do like that they are obscured by this rather
I want to the girl's legs behind the mask and the head in front
so I shove them under the mask and mark the head
-> Edit -> Copy
-> Edit -> Add
this is again a "floating Selection
like this I have a new level
thus I create this new layer
and you have a choice in the new layer
exactly the right place Site of the girls and my mask

13th
now on it is still a text
14th
all layers except the background and get a shadow mask
I take everywhere 2-2-2-no resizing
15th
Look at your picture on ...
Everything in order?
NO - is there a black line that should not be there ...

16th
Now choose your eraser with the "Circle (19)-brush"
and go over the line over it for it to disappear
17th
done - as well as *. xcf *. jpg from
and ready is your bedtime greeting
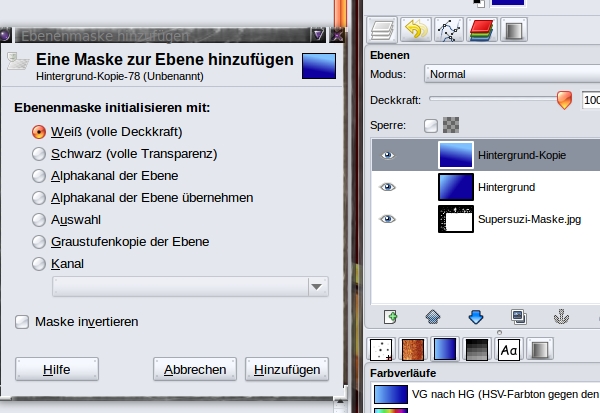
now add the top level of a layer mask to
by you with the right mouse button in the Layers dialog to the top level and click
Layer Mask Add ... "
now you have your layers in the Layers dialog behind preview
still a black box, this is the layer mask
7th
click in the Layers dialog > Invert and then
- - on the layer mask then
-> Colors> Edit -> Copy
8th
now click on the layer mask in the top level
and then -> Edit ->
Here insert you see now that the Top Level the mask in the Layers dialog and
adopted something of a "floating selection" is
9th
this selection anchor us now by clicking on the anchor:
and already you see the mask in your mask layer
10th
click with the right to the top level (the one with the layer mask) and select apply layer mask
11th
is now a shadow on this layer with
3-3-5-no change in size
you save it as *. xcf from
12th
now you are looking for (or more) beautiful Tube (s) assigned
and according to your taste
my tubes are of Shania THANK Shania
your the tubes hönnt under the mask layer slide, do like that they are obscured by this rather
I want to the girl's legs behind the mask and the head in front
so I shove them under the mask and mark the head
-> Edit -> Copy
-> Edit -> Add
this is again a "floating Selection
like this I have a new level
thus I create this new layer
and you have a choice in the new layer
exactly the right place Site of the girls and my mask
13th
now on it is still a text
14th
all layers except the background and get a shadow mask
I take everywhere 2-2-2-no resizing
15th
Look at your picture on ...
Everything in order?
NO - is there a black line that should not be there ...
that is the shadow of the head has been cut ...
no problem, look for the header and mark the level directly under it,
should be the corresponding shadow
16th
Now choose your eraser with the "Circle (19)-brush"
and go over the line over it for it to disappear
17th
done - as well as *. xcf *. jpg from
and ready is your bedtime greeting

I hope you had some fun with my Tut
0 comments:
Post a Comment